
How to Make Zelda’s Pauldrons out of Leather

Photo by Rudy Phototaker
Here’s an overview of the techniques that went into making these Zelda pauldrons! Although this tutorial doesn’t hold your hand through every step, I wanted to give enough information that a curious reader could easily do more research on their own. If you’d like to know more about leather work, try searching for any of the keywords in these steps to find way more detailed resources on how to apply these methods to your own projects.
Keep reading below for more info!
PATTERNS & MOCK-UPS
Veg-tanned leather can be manipulated and formed over other objects through a process called wet-molding. Before even touching my materials, I found an object that was very similar in shape and size to the lower portion of Zelda’s pauldron. For me, this happened to be a bedroom lamp, but you can use whatever object suits your needs.
The lamp is slightly larger than my shoulder, and flares out at the bottom in the same way I wanted the edge of Zelda’s pauldron to flare out. This makes it a great candidate to use as a wet-molding buck (aka, the base form for my leather).

The mock-up pictured on the right is the result of wet-molding leather over the lamp (I’ll go into more detail on that later). Once I had a prototype in my hands, I started drawing on the general shape and details, and trimming away the extra material to fit it to my shoulder.

I used paper and foam make a mock-up of the top piece, fitting it over the bottom piece and making adjustments to both.
When I was happy with my full mock-up, I translated it back into a 2D pattern by flattening out the leather and tracing it onto paper. This allowed me to clean up my lines, make everything symmetrical, and refine the shapes. I made a second foam mock-up based on this pattern to double-check that it could be molded back into the exact 3D shape I was aiming for. It passed the test, so I turned my attention to patterning the surface details.
Using a variety of reference images, I drew all of the design details by hand onto my flat pattern. I then scanned the images and traced them digitally, cleaning up my lines to create a final pattern. Here’s part of it below (I cut this on my Silhouette Cameo 3, but you can cut it by hand if you have to).

My digital pattern for this pauldron (and the rest of Zelda’s accessories!) is for sale at my store.
If you’re using this walkthrough to make identical pauldrons, please consider supporting my work and teaching by purchasing a copy of my pattern.
CUTTING & TOOLING THE LEATHER
I traced my final pattern onto 8-9 oz veg-tanned leather and cut out the pieces with a normal utility knife.

In the above image, the edges of the leather have been beveled on both the top and bottom with an edge beveling tool in Size 3. This tool helps round off leather edges for a cleaner finish. I also began going over my traced design (in silver here) with a swivel knife. This tool scores the surface of the leather without cutting all the way through it. It can be tricky to get the hang of, so make sure you practice first before cutting into your final pieces. Any accidental cuts cannot be repaired.

After all the swivel knife cuts were made, I used beveler stamps in a few different sizes to create deeper impressions. A beveler stamp pushes down the leather on one side of the cut, making the opposite side look like a raised edge. The exact stamps I used were Craftool B197, B203, and B935, all purchased from Tandy Leather. In the above image, the left piece has been cut with a swivel knife, and the right piece has been both cut and beveled.
This type of tooling also requires a mallet (mine is rawhide; other materials are fine), water (from a spray bottle or sponge), and a stone slab (quartz, granite, marble, etc) to use as a work surface.
The stone slab provides shock absorption as you hit your leather piece with a stamp/mallet. It helps muffle the hammering noise and prevents other items on your table from bouncing around as you work. I’m also using a rubber poundo board here in this image, but that’s optional. Also pictured is a tiny metal jewelry anvil that I’m using as a weight to hold the leather in place while I work, allowing both my hands to be free. You can use almost any small, heavy object for this purpose.
Water helps the leather permanently take on surface impressions. I used a small cup and a sponge to apply water in small sections as I worked.

In the above image, the left piece has plain beveled tooling. The right piece has been tooled with a background stamp to add extra surface texture. This smooths out some of the lumpier sections and creates more depth and detail. The exact stamps I used for this step were Craftool A104, A114, and F901 (again, purchased from Tandy.)
WET-MOLDING
With my tooling complete, I moved on to forming my flat leather pieces into the 3D shapes I needed. This brings us back to my trusty lamp.
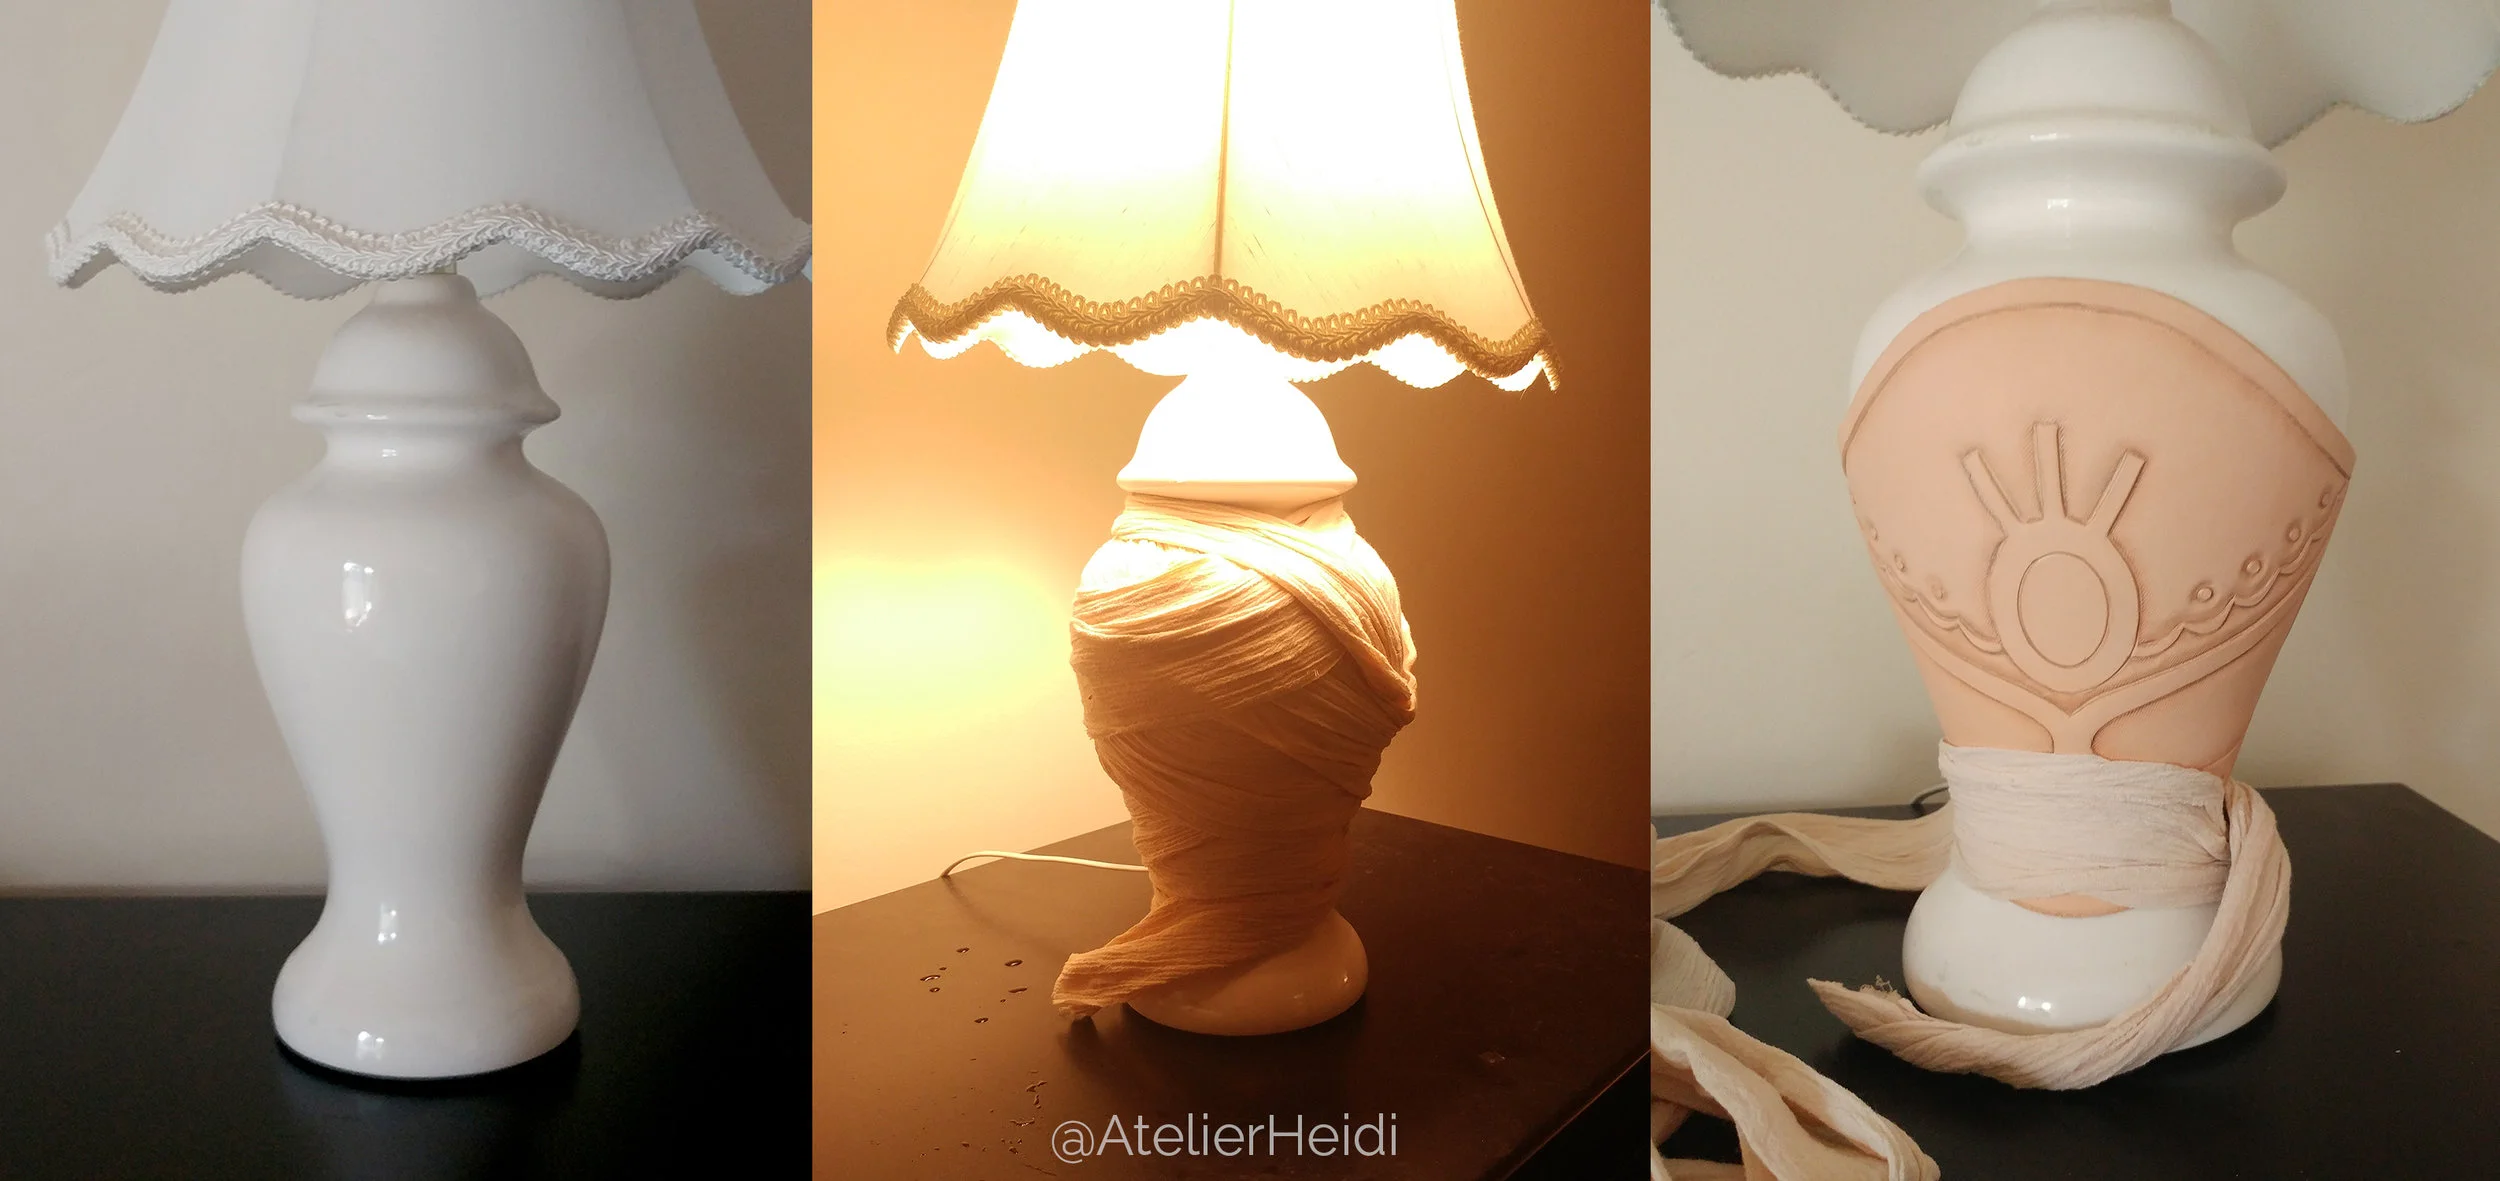
Left: my badass lamp. Middle: Wet leather piece stretched over the lamp and wrapped tightly with gauze fabric. Right: Now dry, the leather holds its new shape on its own.
The more water you apply to veg-tanned leather, the more malleable it becomes. When tooling, you generally only need to apply a small amount of water to the leather’s surface. When wet-molding, you can apply as much water as needed to manipulate it into a new shape. For this pauldron, I held the leather under a faucet and let water run across the entire surface of the front and back. You could go as far as soaking the leather if necessary, but it’s better to start with a little and go up from there. I also recommend removing any rings or other jewelry from your hands, which can very easily scratch the surface of the leather when it is this wet! Be very careful handling it at this stage, especially if you have long fingernails.
After wetting the leather, I pressed it against the body of the lamp and used both hands to smooth it outward from the center. This gradually stretches the leather and molds it around the curved surface of the lamp. Continue working it until you have manipulated it into the shape you need.
You’ll need to devise a method of holding the leather firmly in place while it dries. Depending on your project, there are many viable solutions. In this example, I used a long strip of 100% cotton gauze fabric to tightly wrap the leather against the lamp. The fabric choice is important; cotton gauze is highly breathable, so the water can easily pass through it and evaporate. The fabric evenly distributes pressure across the entire surface of the leather, so that it doesn’t leave marks in the tooled surface. Keep in mind that if you strap it down only around the edges (such as with string or rubber bands) it would most likely leave a permanent indention in that spot.
After leaving it to dry overnight, I unwrapped the gauze to reveal my newly reshaped leather.
I purchased blue acrylic gems from All Star Co to use in this project. I measured and cut a window that was slightly smaller than the gem, then wet-molded the leather to create a raised lip around the edges of the gem.

FINISHING & ASSEMBLY
Before painting and assembling, I used gum tragacanth and an edge slicker to burnish the edges of all of my leather pieces. This is a process of compressing and polishing the rough leather edge into a smooth, hard surface.
I assembled the pieces by stitching them together, hiding the seam along the borders of the top piece. Each stitch hole is punched by hand using a stitching chisel. I then sewed it together using waxed thread and two blunt-tipped needles. The stitch I used is called a saddle stitch, in which the thread passes through each hole twice in a double-helix shape.

The base coat for this gold color was Leather Studio’s gold paint. I then used Angelus bronze paint and several washes of watered down acrylic paint to add shadows and weathering to the paint job. Jacquard Lumiere is another line of excellent metallic leather paints.
After sealing the paint job with Saddle Lac and installing my gems, these pauldrons were ready to go.

My final Zelda costume, debuted at Katsucon 2017. Photo by Mindfall Media.
If you have any simple questions about the information in this post – such as where to buy materials, definitions of terms, or how a tool is used – I invite you to please use Google to your advantage. The internet is brimming with tutorials that cover each of these steps in greater detail. If you have specific questions about my personal decision-making process, you can direct those to my inbox here on tumblr. (I’m more likely to respond to questions that are not asked anonymously, just because I can answer them privately)
This tutorial is not meant to be a comprehensive guide to beginner leatherwork, but I hope it gave you some insight into how a leather armor project comes together.
For live demonstrations of these techniques, check out my YouTube or Twitch channel! I do educational livestreams twice a week where I show and explain various techniques of costume construction. Tune in at: https://www.twitch.tv/atelierheidi
For a digital copy of all of my Zelda patterns, check out my store. Thanks for reading and good luck with all your leather endeavors!
If this tutorial helped you out, consider supporting my work through Ko-fi!
You can also access extra updates by becoming a monthly subscriber on Ko-fi.